
Introduction
My first tomato bed taught me a hard lesson about soil testing garden beds. I poured on fertilizer for 3 springs in a row. Still I got pale leaves and tiny fruit. So I figured the soil just needed more food. A 20 dollar garden soil test came back with the truth. My soil pH sat at just 5.4, which locks up food no matter how much you add.
Most home gardens already hold plenty of food. MSU Extension says plants need 18 different nutrients to grow well. But the median home garden in Minnesota tests at 68 ppm Bray phosphorus. That is 2.6 times more than nearby farm fields at 26 ppm. So most of us waste money on stuff we do not need. And we miss the one fix that would help.
Think of a soil test as the blood test of your garden. A soil sample in a lab tube turns guesswork into hard numbers. It works the same way bloodwork tells your doctor what is wrong. You send 1 cup of dirt to an extension lab for about 15 to 30 dollars. Back comes a clear map of pH, phosphorus, potassium, calcium, magnesium, and organic matter.
This guide pulls together what no other blog covers in one place. You will get lab cost numbers for every test type. You will learn the new EPA lead screening level. It dropped from 400 ppm to 200 ppm in 2024. We cover raised bed sampling depth too. And we walk through a real lab report line by line. By the end you will spot a true nutrient deficiency versus a pH issue. You will stop wasting cash on fertilizer your soil never needed.
7 Best Soil Testing Methods
Each method below is a different tool in your gardener belt. You pick the right one based on the question you need to answer. Some tell you about pH only. Others give you soil texture. A few cover the full nutrient panel or check for lead.
I have used every one of these tests on my own beds over the past 5 years. The extension lab soil test stays the gold standard for serious work. UMN Extension notes that lab results take about 2 weeks to come back. The lab work itself only runs 3 to 5 days. But mail time and queue lines push the total wait to about 10 to 14 days.
County Extension Lab Test
- Accuracy: Highest available for home gardeners, using calibrated extractions like Bray for acidic soils and Olsen for soils above pH 7.4.
- Cost: Around 15 to 30 dollars for a basic test that covers pH, organic matter, phosphorus, potassium, calcium, and magnesium.
- Turnaround: About 10 to 14 days from receipt, with the actual lab analysis taking only 3 to 5 working days.
- Best for: Any gardener making fertilizer or lime choices, since recommendations match local crops and soils.
- Limitations: Standard tests skip nitrogen because it is too mobile, and most do not screen for lead unless you ask for it.
- Buying tip: Order kits straight from your land grant university extension office so your sample gets processed close to home.
Independent Commercial Lab
- Accuracy: Comparable to extension labs and often offers expanded panels for micronutrients, salinity, and CEC.
- Cost: About 30 to 75 dollars for a basic panel and 100 to 250 dollars for full contaminant or heavy metal screens.
- Turnaround: Often 5 to 10 business days, and sometimes faster than extension labs during peak spring submission periods.
- Best for: Urban gardeners wanting lead and arsenic numbers, market growers, and anyone needing fast or expanded data.
- Limitations: Recommendations may be generic rather than tied to local crops, and the cost can climb fast with add-on tests.
- Buying tip: Verify the lab is state certified, like the New York ELAP program for hazardous waste and lead testing.
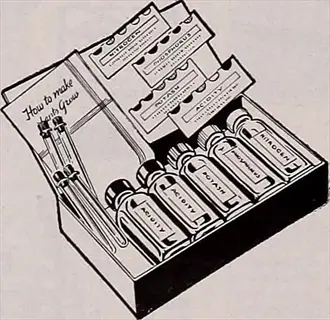
Home Soil Test Kit
- Accuracy: Moderate, useful for spotting major imbalances but not for fine-tuning lime or fertilizer rates.
- Cost: Around 10 to 25 dollars for a multi-pack of capsule tests covering pH and rough NPK levels.
- Turnaround: Immediate, with color comparison readings available within about 10 minutes per chemical.
- Best for: Gardeners wanting quick checks between formal extension tests, or hobbyists with one small bed.
- Limitations: Color interpretation is subjective, expired reagents skew results, and the kit cannot screen for lead or salts.
- Buying tip: Choose a kit with sealed individual capsules and a fresh expiration date, since old reagents distort readings.
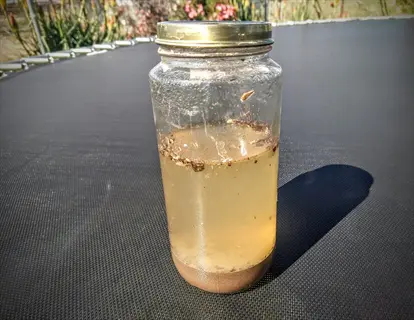
Mason Jar Texture Test
- Accuracy: Good for relative sand, silt, and clay percentages, but it does not measure nutrients or pH at all.
- Cost: Free in practice, since you need only a clear jar, a tablespoon of dish soap, and 24 to 48 hours of settling time.
- Turnaround: Results in about 1 to 2 days as layers separate by particle size and density inside the sealed jar.
- Best for: Checking drainage and water holding traits before you decide to add sand, peat, or compost.
- Limitations: Cannot tell you anything about fertility, contamination, or pH, so it must be paired with a lab test.
- Buying tip: Fill the jar one third with soil, top with water and a tablespoon of dish soap, shake hard, and read the layers after settling.
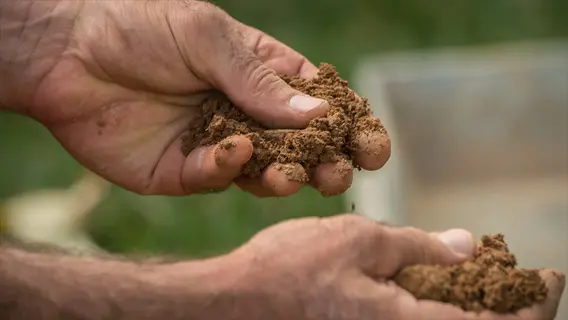
Hand Grab and Squeeze Test
- Accuracy: Subjective, useful as a structural snapshot rather than as a quantified soil analysis.
- Cost: Free, requiring only a hand trowel and 3 to 5 seconds of squeezing damp soil.
- Turnaround: Instant, with a crumb ball that breaks apart in your hand as a sign of healthy loam structure.
- Best for: Quick month to month check ins during the growing season to gauge moisture and soil structure.
- Limitations: Two gardeners can read the same squeeze in different ways, so it cannot replace lab numbers for nutrient planning.
- Buying tip: Practice on a soil you know is healthy first, so you have a baseline crumble to compare against future tests.
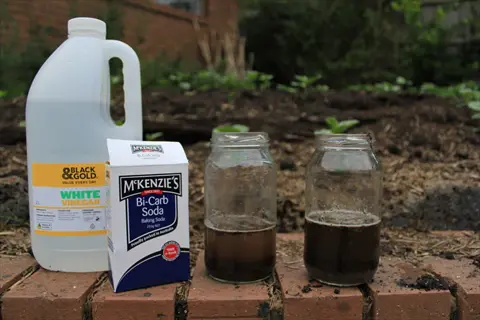
Vinegar and Baking Soda pH Check
- Accuracy: A rough indicator of alkalinity or acidity extremes rather than a precise pH number.
- Cost: Free or pennies, using a half cup each of household vinegar and baking soda mixed with garden soil samples.
- Turnaround: Immediate, with fizzing in the vinegar half indicating alkaline soil above about pH 7.5.
- Best for: Hobbyists who want a quick weekend signal of whether their soil is acid or alkaline at the extremes.
- Limitations: Cannot distinguish slight differences in the 6.0 to 7.0 vegetable range that matter most for nutrient availability.
- Buying tip: Always send a follow up sample to an extension lab if either side gives a strong fizz, since pH correction requires accurate numbers.
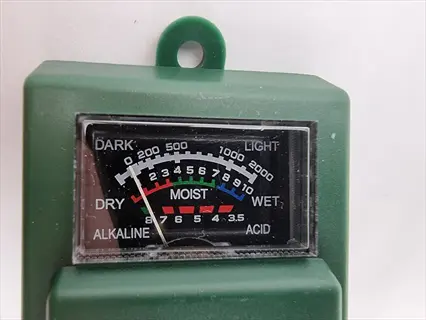
Probe-Style Digital Soil Tester
- Accuracy: Decent for moisture and pH trends, weaker for light and fertility readings on most consumer models.
- Cost: Around 15 to 50 dollars for a basic 3-in-1 probe measuring moisture, pH, and light intensity.
- Turnaround: Instant, with a dial or digital readout within seconds of pushing the probe into damp soil.
- Best for: Tracking pH and moisture trends across raised beds or container plantings between formal lab tests.
- Limitations: Probes need calibration, drift over time, and do not measure nutrients, organic matter, or contamination.
- Buying tip: Always insert the probe into moist soil rather than dry ground, since dry conditions push readings toward false alkaline values.
County extension lab work stays the standard from every land grant school in the country. But quick DIY checks fill the gap between formal tests. I run a mason jar test when I build new beds. I also keep a home soil test kit in the shed for fast checks between my 3 to 5 year lab runs.
Pair a yearly hand grab test with a probe meter to catch trouble fast. A quick vinegar baking soda test can flag wild pH swings in 5 minutes flat. Then mail in a full panel every few years for the hard numbers. This combo gives you the best of both worlds without the cost of a professional soil test each spring.
Soil pH and Nutrient Targets
Think of soil pH as the key that unlocks every other nutrient in your dirt. Penn State Extension teaches that pH controls what plants can take up. So even rich soil with the wrong pH will starve your crops. The optimal pH for vegetables sits in a tight band of 6.2 to 6.8 for most kitchen garden plants.
Below are the hard numbers I check on every lab report. These come from Penn State and UMN Extension labs. I scan for soil nutrients like phosphorus levels, potassium levels, and calcium and magnesium. I also check pH and organic matter on each report. I keep this chart taped on my shed door for fast looks.
Acid loving crops like blueberry, azalea, and rhododendron want pH below 6.2. Elemental sulfur can drop pH over a few months but never in days. Folks in the Southwest fight hard alkaline ground. They must keep adding organic matter to buffer the pH down. Lime works the other way for sour northern soils.
Watch the phosphorus column. UMN sets sufficient at 20 ppm Bray but caps it at 25 ppm. Above that line you stop adding compost or bagged fertilizer to keep P from running off into waterways. Many home beds blow past 50 or 60 ppm because of yearly compost dumps that no one tests first.
Most apparent micronutrients problems come back to pH locking up iron, manganese, or zinc. Fix the pH first and the micros often sort themselves out. Only chase a specific micro with a foliar spray after a lab confirms a real shortage.
How to Take a Soil Sample
Knowing how to take a soil sample matters more than which lab you pick. A bad sample from a great lab still gives bad numbers. The right sampling depth and a smart mix turn a single cup of dirt into a true picture of your whole bed.
Think of it like cake batter. If you only taste the frosting on top, you miss the cake below. But if you scoop from many spots in the bowl and mix samples well, you get the full recipe. The same rule holds for soil. One scoop from one corner lies to you, while 10 mixed scoops tell the truth.
Choose Your Sampling Area
- Group by use: Sample lawn, vegetable beds, and ornamental beds on their own, since each one has different nutrient demands and history.
- Watch for variation: Treat areas with different soil color, drainage, or plant health as their own zones rather than mixing them.
- Note bed size: A small backyard bed can be one sample, while a larger garden over about 200 square feet should be split into more zones.
- Skip atypical spots: Avoid sampling within 25 feet (7.6 meters) of compost piles, foundations, driveways, or paths.
Gather the Right Tools
- Clean trowel: Use a stainless steel or plastic trowel, since galvanized steel can leach zinc and skew results.
- Clean bucket: A plastic bucket prevents metal contact during the mix of subsamples.
- Sample bag: Use the paper or plastic bag from the extension lab kit and label it clear and big.
- Reference card: Write down sampling date, garden zone, and what you plan to grow, since labs use this for fertilizer advice.
Dig to the Correct Depth
- Garden beds: Dig down 7 inches (17.8 centimeters) per MSU Extension advice for vegetables, trees, shrubs, and fruit.
- Lawn areas: Dig only 3 to 4 inches (7.6 to 10.2 centimeters) since turfgrass roots sit near the top of the soil.
- Push aside mulch: Rake aside leaf or wood mulch before each cut so debris does not enter the sample.
- Use a V-shaped slice: Make a V-shaped hole, then take a thin slice from one side at full depth.
Collect Subsamples in a Zigzag
- Sample count: Collect 10 random subsamples per zone, walking the bed in a zigzag pattern for full coverage.
- Even spacing: Space subsamples about the same to catch variation across the whole garden area.
- Avoid hot spots: Skip spots where fertilizer was spilled, where pets dig, or where you just added amendments.
- Consistent depth: Keep each subsample at the same target depth so you average a single soil layer, not mixed layers.
Mix and Reduce the Sample
- Combine in bucket: Pour all 10 subsamples into the same clean bucket and break up large clods by hand.
- Remove debris: Pick out rocks, roots, sticks, worms, and undecomposed mulch before mixing.
- Mix thoroughly: Stir until the soil looks uniform, which makes the final cup a true representative sample.
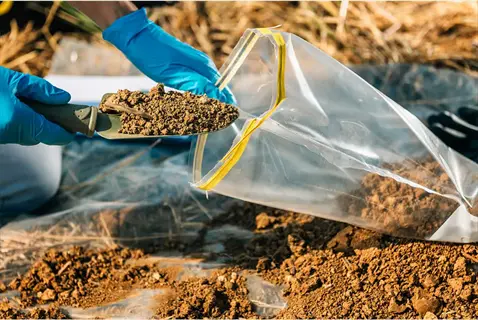
- Reduce volume: Scoop about 1 cup (240 milliliters) of the mixed soil into the lab bag, which equals about 8 ounces (227 grams).
Air Dry the Sample
- Spread on paper: Spread the cup of soil on a sheet of paper or a tray in a clean indoor space.
- Wait 24 hours: Let it air dry soil for about 24 hours so moisture does not skew lab readings or wreck the bag.
- Skip the oven: Never dry samples in an oven or microwave because heat shifts pH and nutrient values.
- Keep it clean: Cover loose with a paper towel to keep dust, pet hair, and bugs out of the drying soil.
Label and Ship the Sample
- Write clearly: Label the bag with your name, address, garden zone, intended crop, and sampling date.
- Include the form: Add the lab submission form, since labs use crop information to set fertilizer rates.
- Pay the fee: Include payment of about 15 to 30 dollars based on the extension lab.
- Mail promptly: Send within a week of collection so the sample reflects current conditions and not aged soil.
I made the rookie mistake my first year of scooping from one corner of the bed. The lab told me my soil was rich, but my plants knew better. Half the bed had hit hard clay while the other half ran sandy. Mix your 10 subsamples like a chef tasting a stew at many spots in the pot. Only then can the lab give you a number that fits your whole bed.
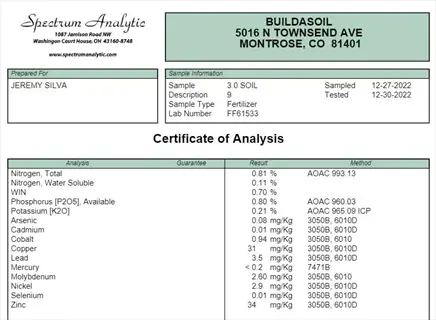
Reading Your Soil Test Report
Your soil test results can look like a foreign language at first glance. When I first opened a lab packet I felt lost. In my experience the format trips up new gardeners the most. Numbers in ppm Bray, lbs per acre, and pounds of lime per 1,000 square feet all sit on one page. The trick to reading soil test results is to treat each line like a receipt at a diner.
Each row gives you a measurement, a quantity, a unit, and a next step. Just like a check at a restaurant lists food, price, and total due. Below I break down the key sections you will see on most lab reports from Penn State, UMN, or other extension offices.
Soil pH and Buffer pH
- Soil pH: The active acid level of your soil on a 0 to 14 scale, with 6.2 to 6.8 ideal for most vegetables.
- Buffer pH: A second pH number that tells the lab how much lime is needed to shift soil pH, since two soils at pH 5.5 may need very different amounts.
- Why it matters: Penn State Extension notes that micronutrient shortfalls trace back to pH locking up nutrients more than to missing nutrients.
- Action: Apply the lime or sulfur amount printed on the report and retest in 12 months, since pH shifts can take a year or longer to take hold.
Phosphorus and Potassium
- Units: Often reported in ppm (parts per million) or pounds per acre, based on the lab.
- Extraction method: Bray is used for soils with pH at or below 7.4, Olsen for soils above 7.4, per UMN Extension.
- Vegetable benchmarks: Sufficient phosphorus for vegetables is 20 ppm Bray, and above 25 ppm means no more P should be added.
- Action: Stop applying P rich fertilizers and bagged compost when phosphorus is already too high, which is common in mature home gardens.
Calcium, Magnesium, and Sulfur
- Calcium: Key for cell walls, with low levels tied to blossom end rot on tomatoes per Penn State Extension.
- Magnesium: Often listed next to calcium since dolomitic lime supplies both at once.
- Sulfur: Required for protein work but rare on standard tests, and available as an add on at most labs.
- Action: Use calcitic lime when calcium is low but magnesium is fine, or dolomitic lime when both are needed.
Organic Matter and CEC
- Organic matter percentage: The share of soil made up of decomposed plant and animal matter, with a 3 to 5% target for veggie beds.
- CEC: Cation Exchange Capacity tells you how much nutrient charge your soil can hold, with higher numbers meaning more storage power.
- Base saturation: The share of CEC sites filled by calcium, magnesium, potassium, and sodium, often shown as a pie chart on the report.
- Action: Top dress 1 inch (2.5 centimeters) of finished compost each year rather than tilling in large volumes at once.
Lime and Fertilizer Recommendations
- Lime recommendation: Most extension labs print a specific lime recommendation in pounds per 1,000 square feet (93 square meters) tied to your crop.
- Fertilizer recommendation: A custom fertilizer recommendation by N, P, and K rate replaces guesswork from a bag label.
- Nitrogen note: Nitrogen is rarely tested direct because it is too mobile, so the lab estimates based on organic matter and your crop.
- Action: Follow the lab number rather than generic rates printed on a bag, since the lab figure reflects your actual soil.
Extension labs give you a personalized plan tied to your stated crop, which is gold for home gardeners. Independent labs send raw numbers and leave the math to you. After 3 years of mailing in samples I learned to read mine without the cheat sheet. When I first started I stuck with extension labs and that built my eye. Now I run both and use the commercial lab for lead panels and the extension lab for nutrient advice.
Testing for Lead & Contaminants
Soil lead testing is the smoke detector of your garden. Just like a smoke alarm checks for something you cannot see, a lead test tells you if your soil is safe to grow food in. Standard nutrient tests skip this part. So you must ask for it on its own. I learned this the hard way after I built a bed against my 1950s house wall and only thought to test for lead after I had eaten the lettuce.
The EPA lowered the lead screening level in 2024 from 400 ppm to 200 ppm. For gardening soils they push for under 100 ppm. About 1 in 4 U.S. yards already sits above the new 200 ppm guideline. Heavy metals in soil include lead, arsenic, cadmium, and mercury, and each one needs its own test or panel from a certified lab.
Who Should Test for Lead
- Urban gardeners: Soils in older neighborhoods often carry leaded gasoline residues from before 1996.
- Pre-1978 homes: Lead paint flakes from older homes can deposit lead near foundations and drip lines.
- Former industrial sites: Properties near old factories, train lines, or junkyards have a higher risk of contamination.
- Edible gardeners: Anyone growing leafy greens or root crops for children or pregnant household members should test.
EPA Soil Lead Guidelines
- Residential screening: EPA lowered the screening level from 400 ppm to 200 ppm in 2024.
- Gardening target: EPA wants gardening soils to stay below 100 ppm total lead.
- Multi-source homes: EPA suggests an even stricter 100 ppm screen for properties with multiple lead exposure sources.
- Scale of concern: At least 1 in 4 U.S. residential yards exceeds the 200 ppm screening guideline.
Choosing the Right Lab
- Certification matters: NY DOH notes that labs must hold the right cert, like an ELAP certified lab for hazardous waste or lead total work.
- Nutrient labs differ: Standard extension nutrient labs may not run total lead, since contaminant work needs different certifications.
- Ask about comparisons: NY DOH says to ask whether the lab compares your results to soil guidance values or standards.
- Cost range: A lead only test costs 25 to 50 dollars, while full contaminant panels run 100 to 250 dollars.
How to Sample for Lead
- Separate by zone: Sample drip lines, vegetable beds, and play areas as their own zones, since lead is patchy.
- Top 6 inches: Sample the top 6 inches (15.2 centimeters) of soil where lead piles up from atmospheric fallout.
- Multiple subsamples: Collect 5 to 10 subsamples per zone and mix as you would for a nutrient test.
- Avoid cross-contamination: Use plastic or stainless tools and a clean plastic bag rather than metal cans.
- Arsenic soil test: Add an arsenic soil test if your property sits on a former orchard or near old pesticide use.
What to Do With Elevated Results
- Above 200 ppm: Switch to raised beds with imported soil and a barrier cloth, special for leafy greens and root crops.
- Above 100 ppm: Wash produce well and pick fruiting crops, since they soak up less lead than greens.
- Add organic matter: Compost binds lead and cuts uptake when worked into the top 8 inches (20.3 centimeters).
- Cover bare soil: Mulch or cover crops cut dust exposure and stop tracking of contaminated soil indoors.
Urban garden soil carries the most risk by far. I tested 3 plots at a friend's old Brooklyn brownstone last spring. The drip line read 412 ppm lead. The front yard near the curb read 287 ppm. Only the back corner came back under 100 ppm. We built raised beds with imported soil and a barrier cloth for the front. Now her family grows tomatoes and peppers without worry.
Raised Beds & Container Soil
A raised bed soil test is not the same as testing an in ground bed. Think of a raised bed like a small soup pot. One bad pinch of salt ruins the whole batch. A big in ground garden is like a stock pot that buffers a small mistake. So tiny errors in a 4 by 8 foot bed hit your crops much harder.
I built my first raised bed in 2021 right when raised beds boomed across the country. I dumped 4 bags of premium mix in and figured the label meant safe and balanced. My soil sample came back with phosphorus at 92 ppm Bray and pH at 7.8. Both bagged in commercial mixes from day one. Potting mix nutrients can be wildly off from the bag claim.
Sampling Depth in Raised Beds
- Short beds: For beds 8 to 12 inches (20.3 to 30.5 centimeters) deep, sample the whole profile rather than only the top 7 inches.
- Deeper beds: For 18 inch (45.7 centimeters) or taller beds, sample the top 7 inches as you would in ground gardens.
- Sampling depth raised bed: A good rule is to match sampling depth raised bed rules to the root zone of your main crop.
- Mix subsamples: Take 5 to 10 subsamples across the bed and mix them, since even a 4 by 8 foot (1.2 by 2.4 meter) bed has variation.
- Skip the corners: Avoid the outermost 2 inches (5.1 centimeters) along bed walls because soil there can be drier and saltier.
Container Soil Sampling
- Container soil test: A proper container soil test starts with a clean tarp and a careful mix of the whole pot.
- Full pot sample: Dump the entire container onto a tarp and mix the soil through before you scoop your sample.
- Group by mix: Treat pots filled with the same purchased mix as one zone to save lab fees on multiple pots.
- Watch for salts: Containers concentrate fertilizer salts over time, so ask for an electrical conductivity (EC) test from your lab.
- Sample yearly: Containers burn through nutrients faster than in ground beds, so once a year testing makes sense for serious growers.
Common Issues in Purchased Mixes
- High phosphorus: Bagged compost and raised bed blends often push phosphorus past the 25 ppm Bray UMN threshold.
- Variable pH: Peat heavy mixes can test below pH 5.5, while compost heavy mixes may run above pH 7.5.
- Raised bed pH: A starter raised bed pH test in month one catches off ratio bagged mixes before you plant.
- Salt buildup: Slow release fertilizer in mixes can spike electrical conductivity and burn young roots.
- Low calcium: Some bagged mixes lack calcium, which leads to blossom end rot on tomatoes per Penn State Extension.
Refreshing Bed and Container Soil
- Soil refresh: A yearly soil refresh of 1 to 2 inches (2.5 to 5.1 centimeters) of finished compost beats a full soil swap.
- Salt buildup: Watch for crusty white film on top, which signals salt buildup from too much fertilizer.
- Mineral balance: Lime, sulfur, or gypsum should be added based on lab results, never by guesswork.
- Refresh containers: Replace at least 30% of container soil each year, special for heavy feeders like tomatoes and peppers.
- Cover crop option: In larger beds, a low growing cover crop over winter rebuilds organic matter and adds biology.
My biggest lesson with raised beds is that bagged does not mean safe or balanced. Test every new raised bed within the first month. Then retest each spring before you add more compost. Containers go through nutrients fast and need a yearly check. The small effort pays off in stronger plants and bigger harvests.
5 Common Myths
Home soil test kits from the garden center are just as accurate as a certified university extension lab.
Home kits estimate pH and rough NPK trends, but extension labs use calibrated extractions like Bray or Olsen for accurate ppm values.
If plants look green and healthy, your garden soil does not need a test for at least another decade.
Phosphorus and lead build up silently, so testing every 3 to 5 years protects waterways, fruit safety, and future yields even when plants look fine.
Adding more compost or fertilizer every spring is always good for the garden because plants love nutrients.
Over-applying phosphorus can push levels past 25 ppm and leach into waterways, fueling algal blooms while delaying harvest and reducing fruit quality.
Lead in garden soil is only a concern for industrial sites and is not relevant to typical backyard gardens.
The EPA lowered the residential lead screening level to 200 ppm in 2024, and about 1 in 4 U.S. yards already exceeds this guideline.
Soil pH does not really matter as long as you keep adding fertilizer because plants will still take up what they need.
Most micronutrient deficiencies happen because pH outside 6.2 to 6.8 locks up nutrients in the soil, no matter how much fertilizer is added.
Conclusion
A full soil testing garden routine boils down to 3 simple moves. Test your soil every 3 to 5 years with an extension soil lab. Aim for a soil pH between 6.2 and 6.8 for most vegetables. And screen for lead if your property is urban or built before 1978. Hit these 3 marks and your beds will outperform 90% of home gardens with half the work.
MSU Extension reminds us that many home soils already hold plenty of food. Most beds need little or no extra fertilizer once you test and confirm the numbers. So soil pH testing is the cheapest way to stop wasting money on stuff you do not need. When I first tested my front bed I learned my soil test results ruled out 80 dollars of compost I planned to buy. One 20 dollar test caught it cold.
The best routine pairs a formal extension soil lab report every few years with DIY checks in between. A quick probe meter read or jar test catches drift fast. I tested my beds for 3 years in a row to find the right rhythm. Now I run a probe check each month during the growing season. Then I mail in a full panel every 4 years for the hard numbers. This combo gives you healthy garden soil without breaking the bank or chasing trends on social feeds.
Picture the difference between guessing every spring and knowing exactly what your beds need. One cup of dirt and 15 to 30 dollars can replace years of guesswork. The right garden soil amendment at the right rate beats a wheelbarrow of compost dumped on faith. In my experience the spring or fall test gives the most useful timing because the ground is workable. The 10 to 14 day turnaround leaves plenty of room before planting day arrives.
External Sources
Frequently Asked Questions
How do I test the soil in my garden?
Collect 10 subsamples 7 inches deep across your garden, mix them in a clean bucket, air dry about 1 cup, and mail it to a certified extension lab.
How much does a soil test cost?
Typical price ranges are:
- Extension lab basic test: 15 to 30 dollars
- Independent commercial lab: 30 to 75 dollars
- Home DIY kit: 10 to 25 dollars
- Lead-only lab test: 25 to 50 dollars
- Full contaminant panel: 100 to 250 dollars
How do I know if my garden soil is good?
Healthy garden soil is dark, crumbles in your hand, smells earthy, contains earthworms, drains within hours of rain, and has a lab pH between 6.2 and 6.8.
Do I need to test my garden soil?
Yes, especially for new beds, edible crops, urban or older properties, and any garden where plants have struggled despite proper watering and sun.
Can you do a soil test yourself?
You can run pH, texture, and basic NPK checks at home with a kit or pantry items, but only a certified lab gives accurate ppm values and lime recommendations.
Why is vinegar used for soil testing?
Vinegar is acidic, so when it fizzes after contact with soil it signals an alkaline pH above about 7.5 caused by carbonate minerals reacting with the acid.
Is a soil tester worth it?
Probe-style soil testers are useful for quick pH and moisture trend reads, but they should never replace a certified lab test for nutrient and lime decisions.
Is soil testing free?
Some county extension offices run free clinics, but the standard lab analysis fee of 15 to 30 dollars usually still applies for nutrient and pH reports.
How deep do you have to dig for a soil test?
Dig 7 inches deep for vegetable beds, trees, shrubs, and fruit, and only 3 to 4 inches deep when sampling lawn or turfgrass areas.
What are 5 key indicators of healthy soil?
Key indicators include:
- Dark color from organic matter
- Crumbly granular structure
- Active earthworm population
- Earthy smell from soil microbes
- Good drainage within a few hours