Houseplant · Araceae
Black Velvet Elephant Ear
Alocasia reginula 'Black Velvet'
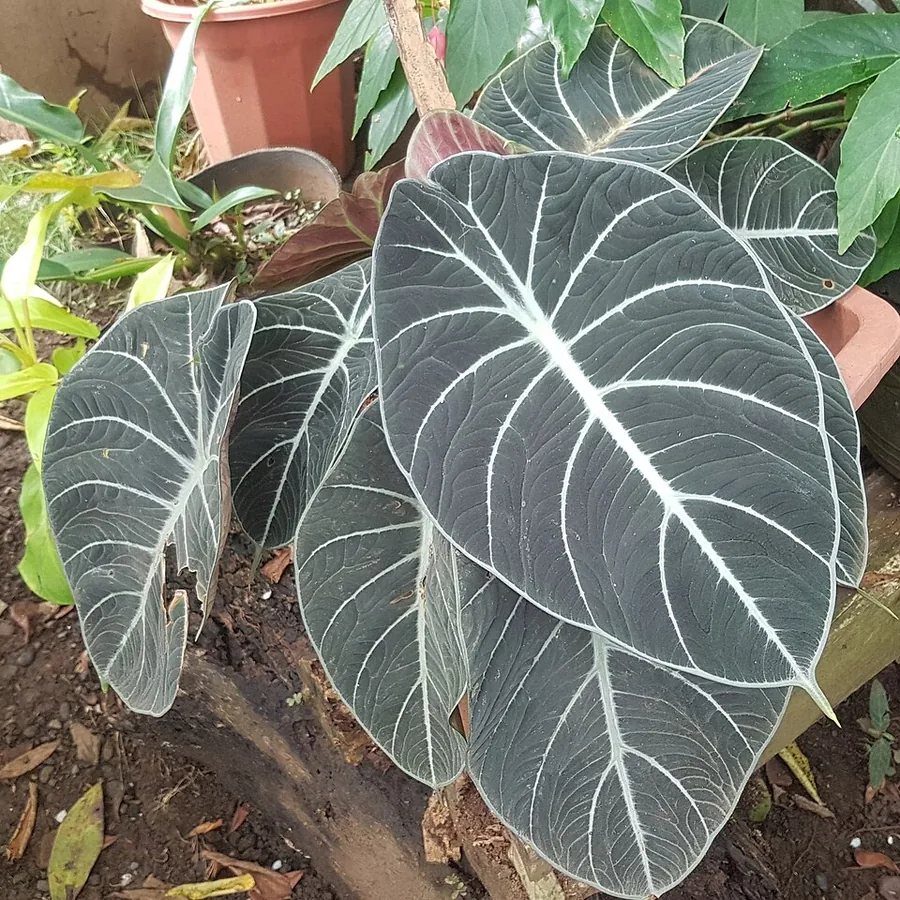
A compact jewel alocasia whose velvety black leaves and silver veins reward an attentive hand.
Bright indirect
USDA 10–12
18 in · 46 cm
Overview
The Black Velvet sits among the small jewel alocasias, valued for thick, almost black leaves laced with bright silver veins. It keeps a tidy footprint, topping out near 18 inches (46 cm), so it earns a place on a console or side table rather than standing in for the floor-scale elephant ear most people imagine. It is an aroid by lineage, with roots in the rainforests of Borneo.
Think of it as a plant for someone who enjoys a quiet challenge. Growth comes slowly, cold is unwelcome, and the slightest stretch of soggy soil invites rot, so the whole of its care is about paying attention and resisting the urge to keep pouring water. Get that rhythm right and you have one of the more arresting pieces of greenery a room can hold.
Worth settling before it joins the household: every part carries calcium oxalate crystals that irritate the mouth and skin. This is a genuinely toxic plant around pets and a real hazard for small children, so give it a spot well beyond the reach of curious mouths and paws.
Care
The short version: bright indirect light, high humidity, and warmth, paired with measured watering that lets the top half of the soil dry before the next round. Overwatering is the quickest way to lose it.
Light
Place it in bright, indirect light, the soft glow beside a window rather than the harsh midday sun that scorches its dark leaves. It will tolerate partial shade, but too little brightness drags down an already slow grower and flattens the velvety look that makes it worth a spot in the room.
Water
Watering is the step that undoes most of these plants. Wait until the top half of the soil dries before the next drink, and pull back through winter, since the genus rots quickly from sitting wet. Never let the pot linger in a saucer of standing water.
Soil
Reach for a moist but well-drained, organically rich mix that holds a little moisture without going swampy. Any pH from 5.0 to 8.0 suits it, though drainage counts for far more than the exact figure, because a dense, water-holding soil is what brings on root rot.
Humidity
This is a high-humidity plant, content in the damp air of a rainforest floor. Dry indoor air wears on it and opens the door to spider mites, so a steamy bathroom, a pebble tray, or a small humidifier earns its keep.
Feeding
Offer food across the active spring and summer stretch and taper off or stop through winter rest. A seasonal feeding pattern fits it well, since pressing nutrients on a dormant plant does nothing useful.
Pruning
No shaping is asked of you here. Simply remove dead, yellowed, or damaged leaves as they turn, which keeps the plant looking its best and leaves pests fewer corners to hide in.
Repotting
Repot only when it plainly calls for it, since this cultivar dislikes being disturbed and grows at a slow pace. Spring or summer is the window, and it pairs neatly with division if you want more plants, while a fresh fast-draining mix each time helps keep rot at bay.
Overwintering
Ahead of the first fall frost, move pots to a humid, cool spot around 60°F to 65°F (16°C to 18°C) and ease off the watering. Freezing finishes the foliage, but the plant can rest the winter through and push fresh leaves once warmth returns.
Size & spacing
Look for a compact form, up to about 18 inches (46 cm) tall when mature. Its slow pace and small stature make it a natural for a shelf or tabletop rather than a corner of the floor.
Troubleshooting
Nearly every issue with this plant comes down to water, humidity, or cold. Read the soil and the leaves as a pair, since one symptom can mean too much water just as easily as too little air. Find the match below, then step in before it spreads.
A plant that wilts and folds in on itself while the soil is still damp
What looks like a thirsty plant is actually root rot, and the trail nearly always leads to too much water held in a heavy mix. Slide the plant from its pot and look at the roots, which go brown, black, and soft once decay sets in. Pull back on watering, snip away the spoiled roots along with any slumped foliage, and settle it into a fresh, gritty, fast-draining medium.
Fix:
- Reduce watering immediately
- Repot into fresh, gritty, fast-draining medium
- Remove rotted roots and any collapsed growth
Brown marks spreading on the foliage while the soil stays soggy
Leaf spots tend to arrive when the mix never gets a chance to dry, and NC State groups them with root rot as a sign of too much water. Stretch out the time between waterings, give the pot better drainage and the room more air movement, and remove the most marked leaves. Keeping the foliage from staying damp is the most dependable way to halt fresh spots.
Fix:
- Reduce watering frequency
- Improve drainage and air circulation
- Remove badly affected leaves
A faint web and a dull, speckled haze settling over the leaves
The culprit is spider mites, a regular visitor to indoor plants once the air dries out. Turn the leaves over and look for the pinpoint mites and their thin webbing, which spreads quickly in low humidity. Hose down the foliage, lift the moisture in the air around the plant, and treat it as needed until they clear.
Fix:
- Rinse foliage
- Raise humidity
- Treat as appropriate for spider mites
A tacky film and white tufts gathering where leaves meet the stem
The signs point to mealybugs, often with scale alongside them, and both favor a plant kept indoors. Search the leaf joints and undersides for the white cottony clumps. Wipe away whatever shows, treat the rest, and keep up a routine look-over so a few survivors don't quietly rebuild.
Fix:
- Wipe off visible pests
- Treat infestation as appropriate
Foliage fading away as the season turns cold
More often than not this is cold damage and natural dormancy rather than the end of the plant. Frost finishes the leaves, yet in mild zones it sprouts again from the base when warmth comes back, and a potted one can ride out the season indoors. Shift pots to a humid, cool corner around 60°F to 65°F (16°C to 18°C) before frost, dial down the watering, and let it sit quiet until growth stirs again.
Fix:
- Bring pots indoors before frost to a humid, cool spot around 60-65°F
- Reduce watering over winter
- Allow the plant to rest and resume growth when warmth returns
Toxicity
Handle this as a toxic plant from the start. Every part holds insoluble calcium oxalate crystals, microscopic needles that burn the mouth and throat if chewed and leave skin red and itchy where the sap lands. Keep it well clear of pets, livestock, and small children, and rinse your hands once you have handled it.
Toxic to
Cats · Dogs · Horses · Rabbits · Livestock · Birds · People
Cats Moderate
A cat that takes a bite knows it at once. Look for a burning mouth, swollen lips, tongue, and throat, streams of drool, vomiting, and a struggle to swallow.
Dogs Moderate
A chewed piece brings dogs the same sharp distress: a swollen, sore mouth, drooling, pawing at the muzzle, vomiting, and trouble getting anything down.
Horses Moderate
The oxalate crystals leave a horse with a raw, swollen mouth and throat, drooling, and difficulty swallowing. Set the plant where no grazing animal can reach it.
Rabbits Toxic
The crystals that sting every other animal make this plant unsafe for rabbits as well, so keep them from nibbling the leaves entirely.
Livestock Toxic
Cattle, goats, and sheep face the same danger. Calcium oxalate inflames the mouth and gut, so the plant belongs nowhere near where livestock browse.
Birds Toxic
The crystals can injure pet birds too, so keep cages and perches well clear of the leaves.
People Caution
None of this plant is food. A taste leaves the mouth burning and swollen, and the sap can turn skin red and itchy, so rinse your hands after handling it and keep it from small children.
All parts contain calcium oxalate crystals; sap can cause contact dermatitis.
Helpline numbers

United States
ASPCA Animal Poison Control: (888) 426-4435 (fee applies)
Poison Control: (800) 222-1222



Canada
Poison Centres: 1-844-764-7669
How to propagate
Really only one method works on this plant with any reliability, and it calls for a careful touch more than any particular knack.
DivisionModerate
Spring to summer · Several weeks
Dividing it is the dependable route, and NC State names splitting off the offsets as the method to use for alocasia. Choose spring or summer, while the plant is putting on active growth. Lift it from the pot, gently work the rhizomes and offsets apart, settle each into its own container, and allow several weeks for it to anchor and root before new top growth appears.
Myths
If an alocasia sheds its leaves over winter, the plant is finished.
Chilly weather and a natural rest send the foliage into decline, a sight that worries the eye but seldom signals death. Frost does take the leaves, yet in mild zones the plant returns from the base when warmth comes back, and a potted one carried indoors will sprout again. Let it rest and hold off before deciding it is gone.